Articles
How to Use Branching and Staging in Framer
A step-by-step guide for marketing teams to create, review, and test website changes before publishing them to the live site.
By
Alex Ran
·
·
9
min read
Key takeaways
A branch is a separate workspace for creating and reviewing larger changes.
Main is the central project where approved work is collected.
Staging is a published test version of the website.
Production is the public website on your custom domain.
Applying a branch does not publish the website.
Publishing to staging does not change the live website.
The live site changes only when a version is deployed to production.
Small copy and CMS updates may not need a branch.
Forms, integrations, tracking, and responsive layouts should still be tested before deployment.
Give one person clear responsibility for approving production updates.
Your Framer website will continue to change after launch.
Marketing may need to update the homepage, publish a campaign page, revise product messaging, or test changes made by a Framer Agent.
Small edits can often be made directly. Larger or higher-risk changes benefit from a clearer review process.
Framer provides two tools for this:
Branching gives you a separate workspace for making changes.
Staging gives you a test version of the website to review before updating the live domain.
Used together, the process looks like this:
Create a branch → Make changes → Review → Test on staging → Publish to the live site (aka. Deploy)
Branching, Staging, and Production
These terms describe different parts of the publishing process.
Feature | What it means | When to use it |
|---|---|---|
Branch | A separate working copy of the Framer project | While creating or reviewing a larger update |
Main | The central version of the project where approved work is collected | After a branch has been reviewed and approved |
Staging | A published test version of the website that is separate from your live domain | When the update is ready for browser, mobile, form, and integration testing |
Production | The public version visitors see on your custom domain | After the staged version has passed final review |
In simple terms:
A branch is your draft workspace.
Main is the approved working version of the project.
Staging is the dress rehearsal.
Production is the live website.
Your public website only changes when someone deliberately deploys an approved version to production.
How to Use Branching in Framer
Use a branch when an update needs more work or review before it becomes part of the main project.
This is useful for:
a new campaign page
homepage messaging changes
a pricing-page update
a redesign
changes across several pages
updates made by a Framer Agent
work that needs stakeholder approval
1. Create a Branch
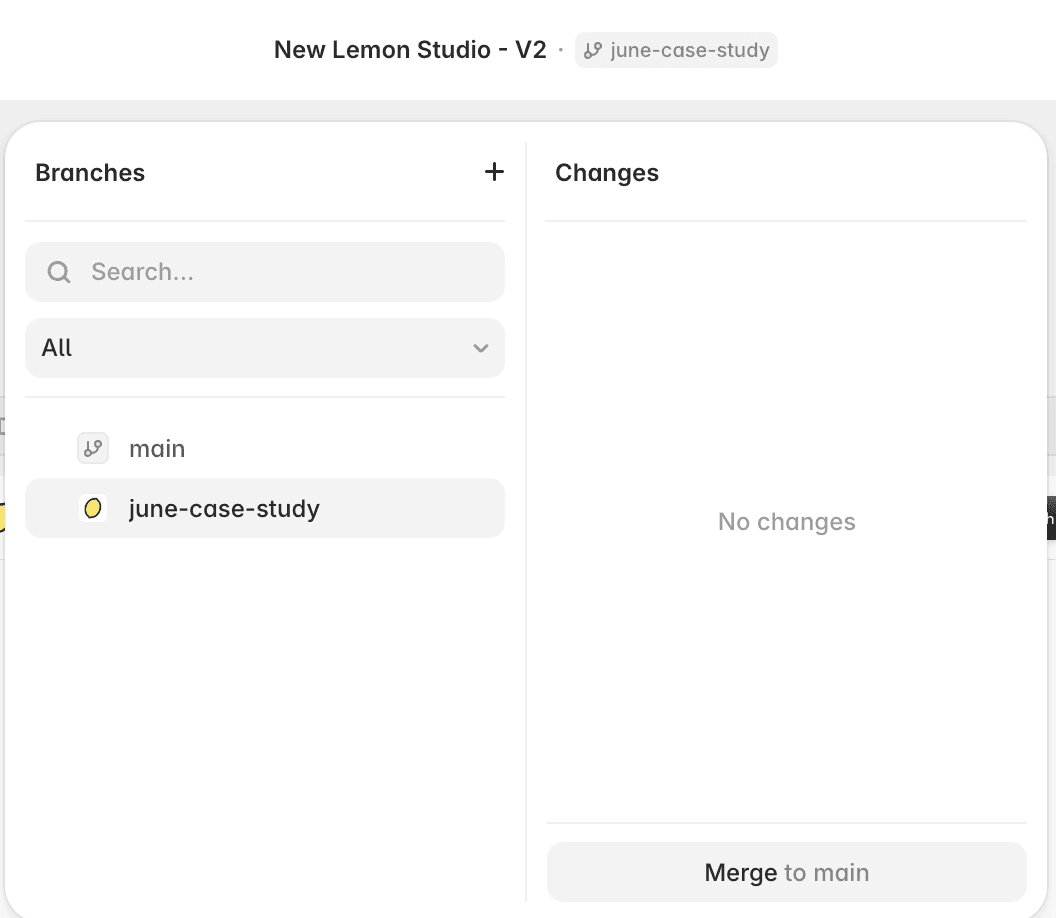
Open your Framer project and select main in the top bar.
Choose New Branch, then give it a clear name.
For example:
q3-campaign-pagehomepage-copy-updatepricing-page-refreshaccessibility-fixes
Name the branch after the work being completed, rather than the person doing it. This makes it easier for the team to understand what each branch contains.
Creating a branch makes a separate copy of the project. Changes made there will not affect the main project or live website.
Example: Create a new branch and rename it june-case-study.
2. Make and Preview the Changes
Make your changes inside the branch as you normally would in Framer.
You can update pages, copy, CMS content, components, or styles without changing the main project.
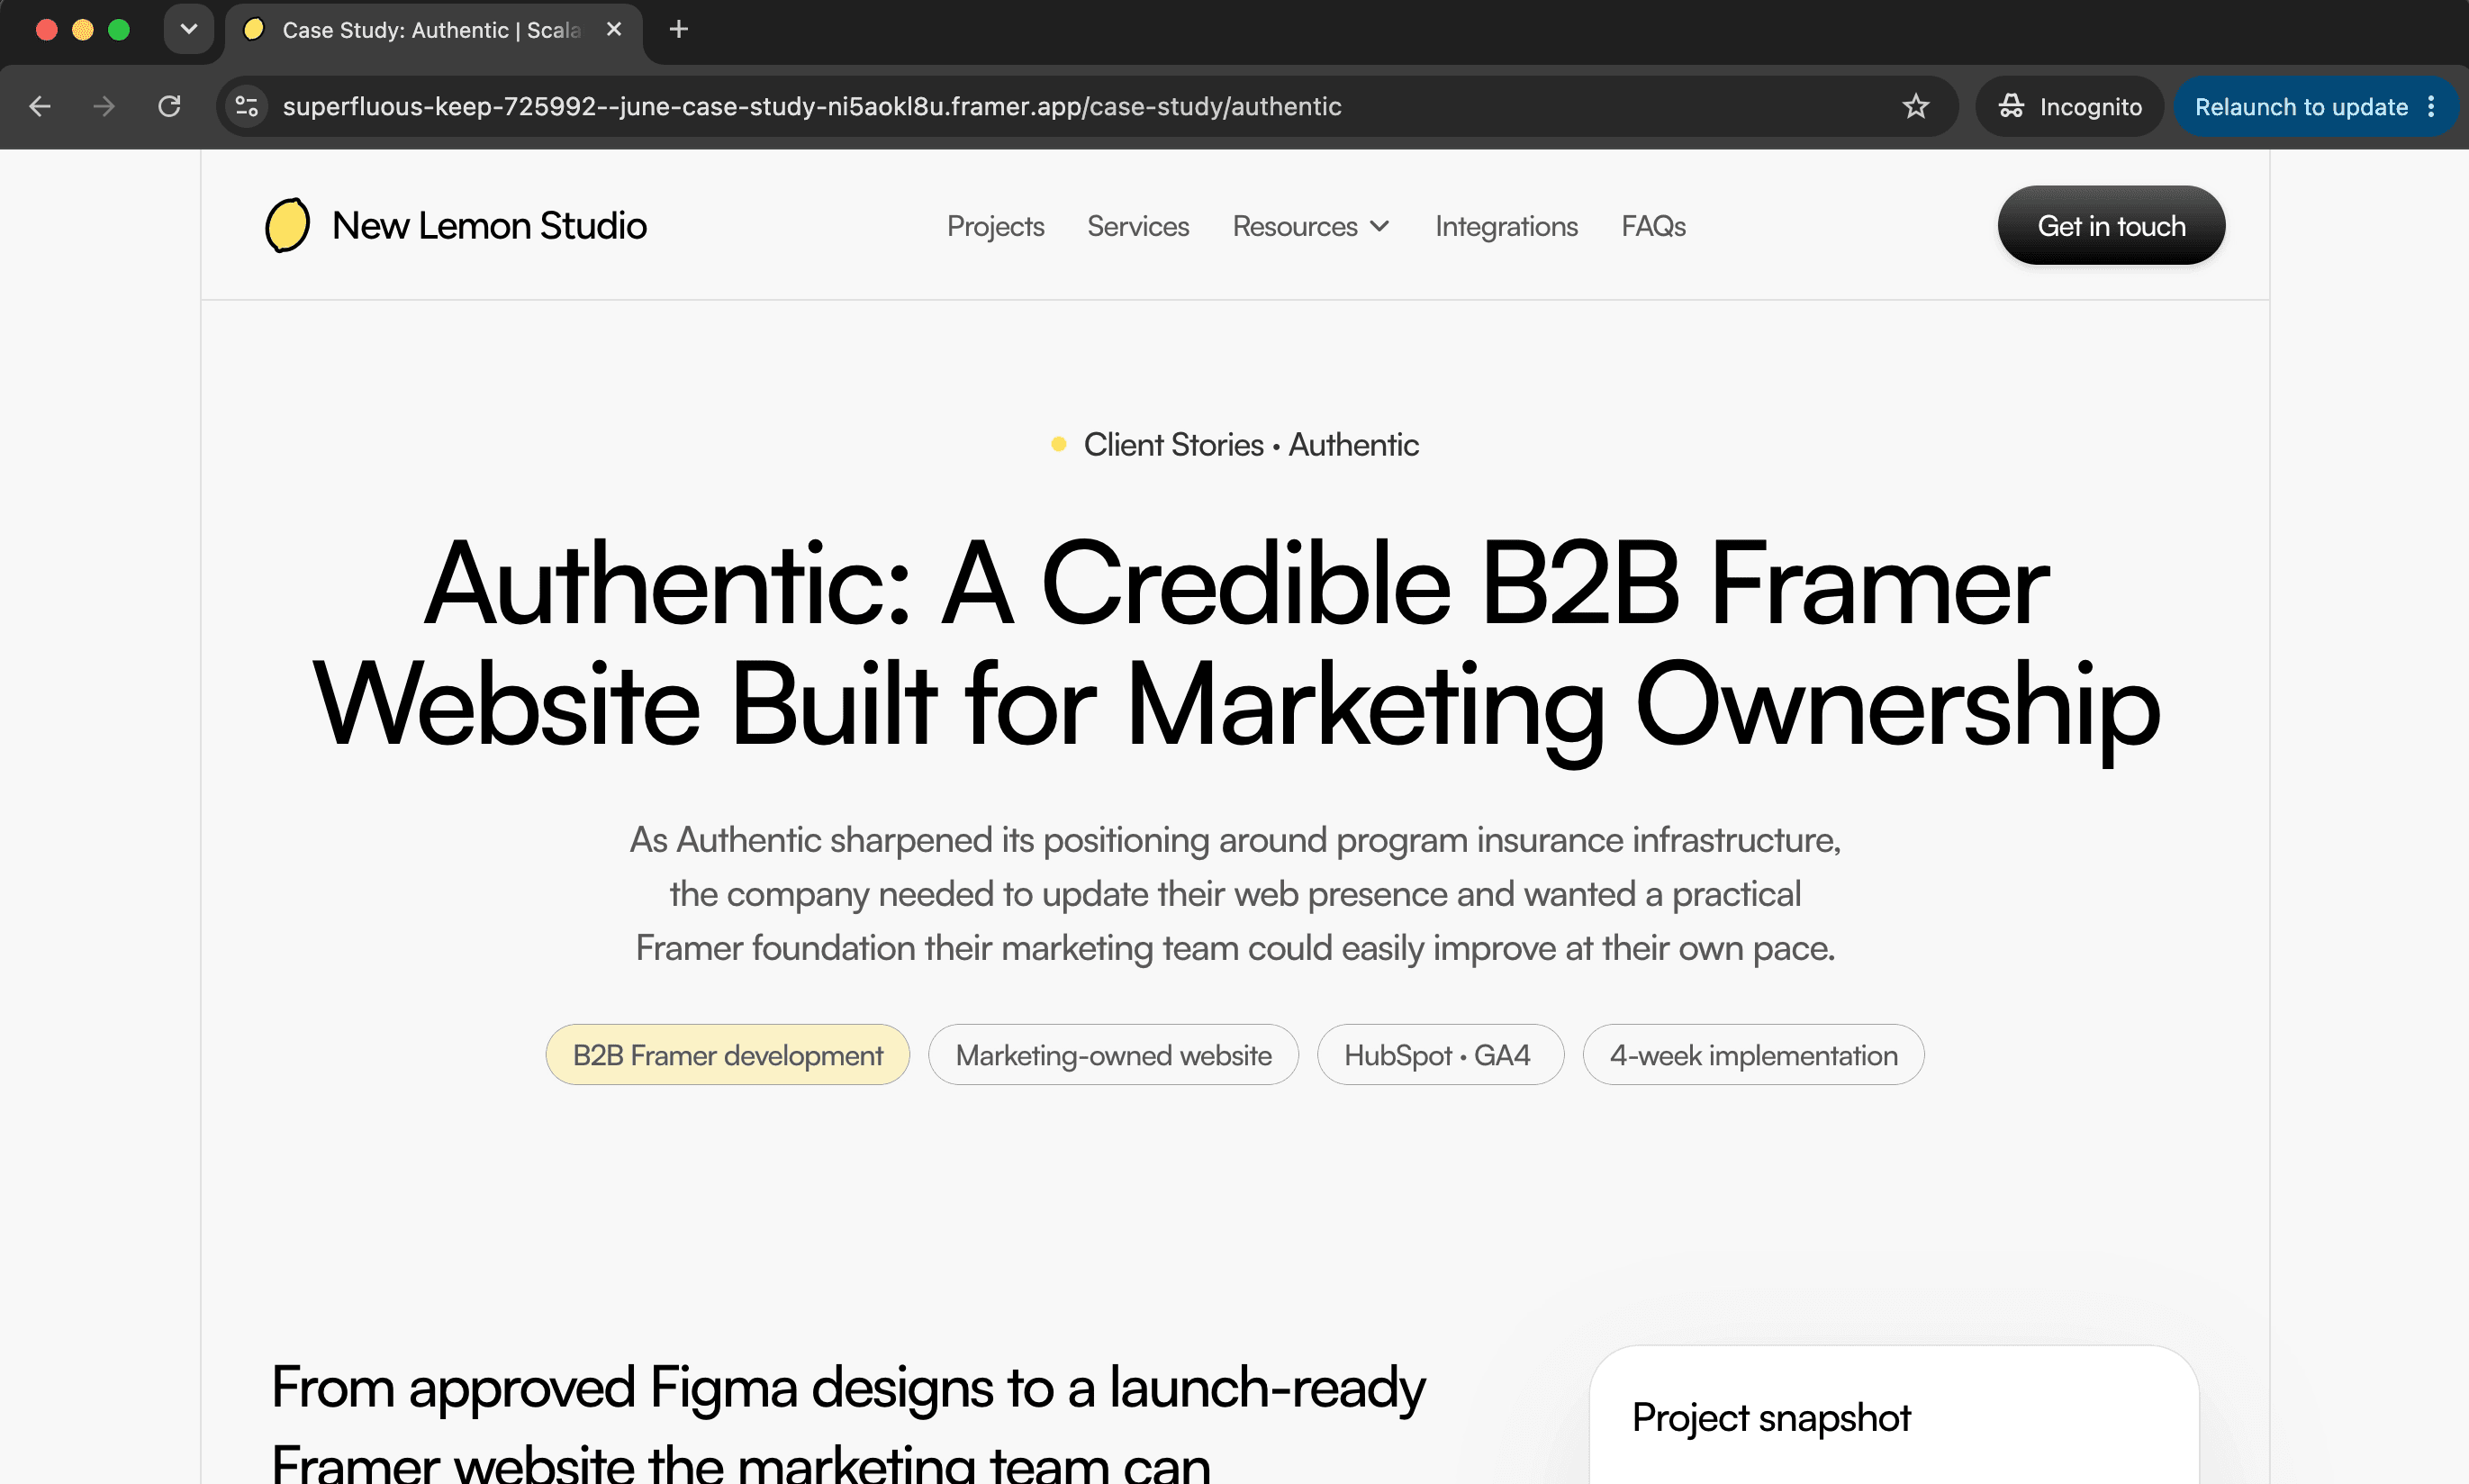
When the work is ready for review, publish the branch to create a preview link.
Share this link with teammates, clients, or other stakeholders. They can review the update in a browser without changing the live website.
Example: Select Publish in the top-right corner, then select Update. This publishes the current branch only. Open the link below to review the branch in a browser.
This does not update the live website.

3. Review and Apply the Branch
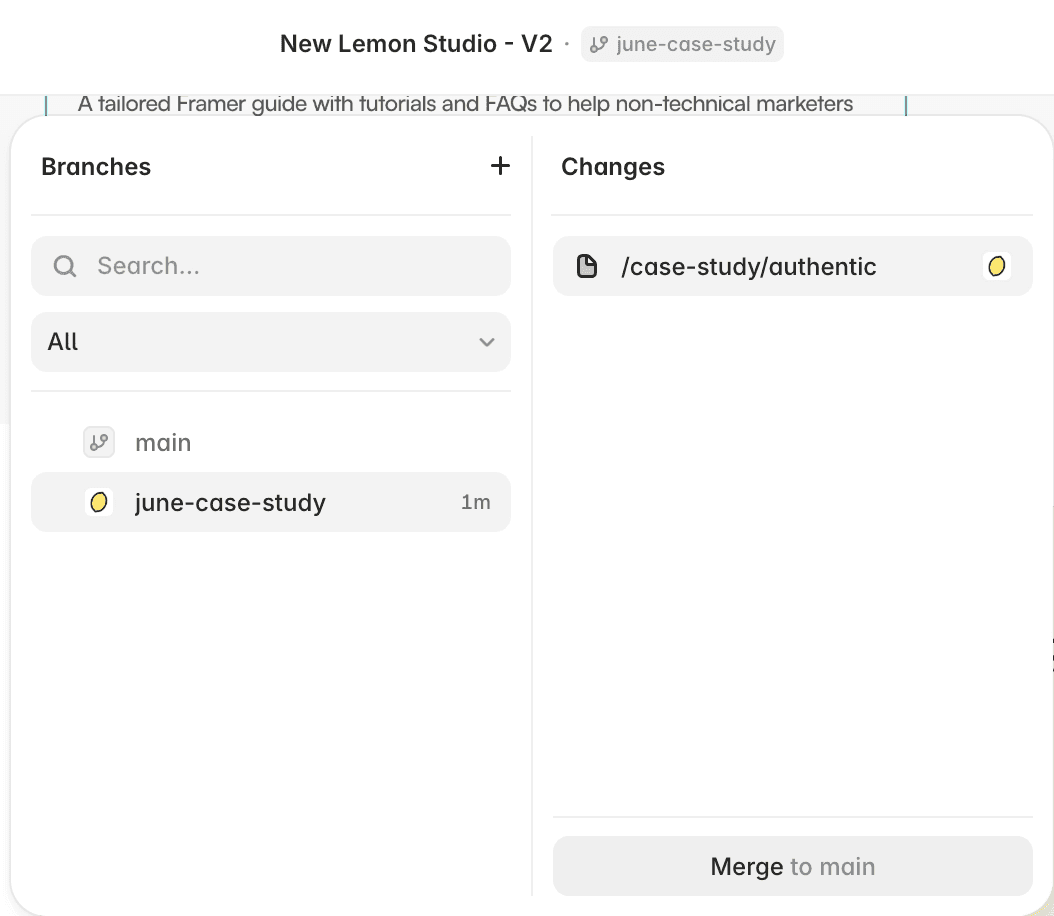
Once the update is approved, open the branch and select Review Changes.
Framer will show what has changed.
Review the affected pages and content, then select Apply to move the approved changes into the main project.
Applying a branch does not make the changes live. It only adds them to main. The website still needs to be published to staging and then deployed to production.
Example: Apply the branch to merge the approved june-case-study changes into main. The changes are now part of the main project, but visitors cannot see them yet.
How to Use Staging in Framer
Once the approved work has been added to main, staging lets you test it as a published website before updating your live domain.
The staging site is separate from the production site:
Staging shows the version your team is currently testing.
Production shows the version currently available to the public.
This is useful because some issues are easier to find in a browser than in the Framer editor.
For example:
a form may not submit correctly
an embed may take time to load
a mobile layout may be cut off
a link may point to the wrong page
an analytics event may not fire
a cookie banner may behave unexpectedly
Staging is available on Framer Pro and higher plans and requires a connected custom domain.
1. Enable Staging
Open:
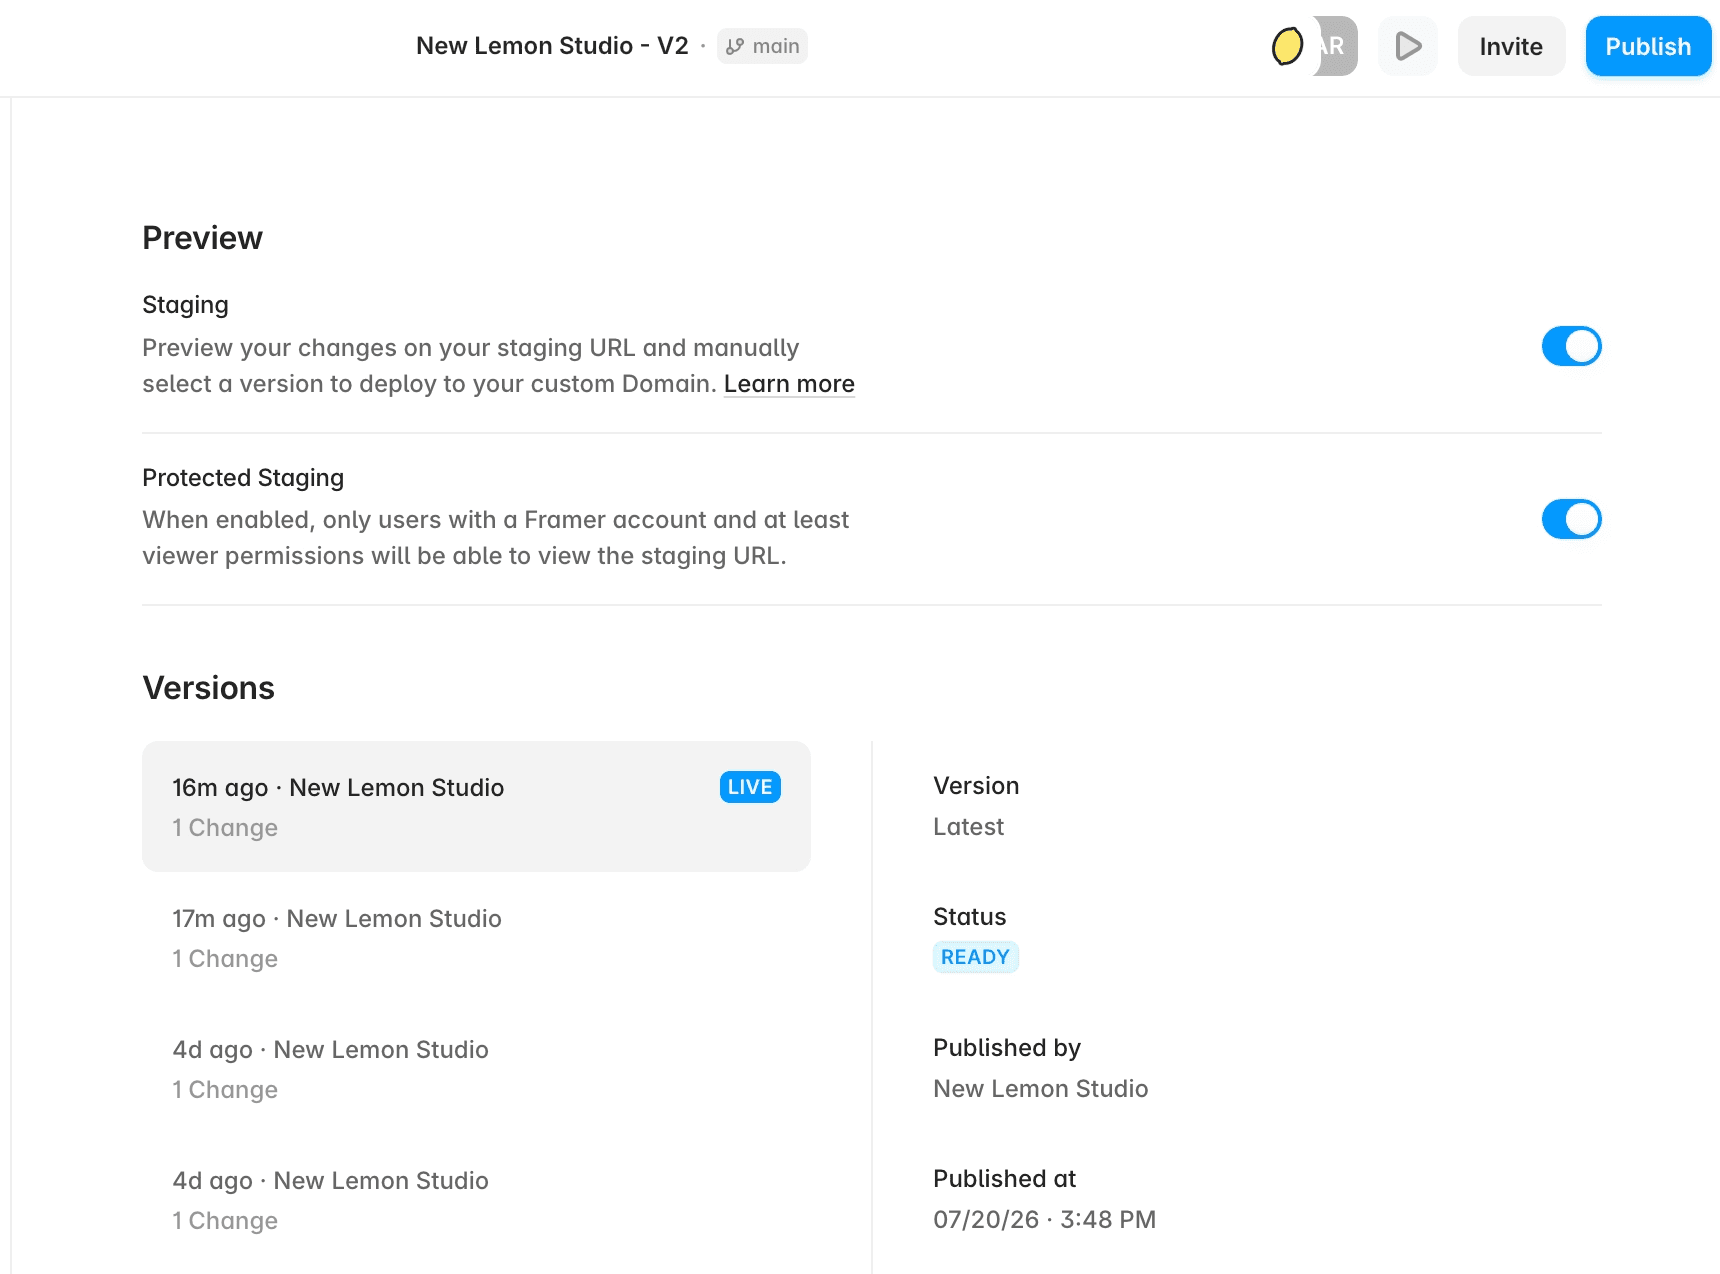
Site Settings → Staging & Versions
Select Enable Staging.
Once enabled, Framer separates your test site from your live site:
the Framer-provided domain shows the staged version
your custom domain continues showing the current live version
This lets you publish and review updates without changing what visitors see.
Example: Switch on Staging to create a buffer between making changes and publishing them to your visitors.
2. Publish to Staging
Open Framer’s publishing controls and choose the Staging environment.
Publish the latest version, then open the staging link in a browser.
For a B2B marketing website, check:
navigation and links
contact and demo forms
CRM routing
Calendly or other booking tools
CMS pages
desktop and mobile layouts
analytics and conversion tracking
cookie consent
embedded tools
redirects
You can publish to staging several times while fixing issues. None of these updates will affect the custom domain.
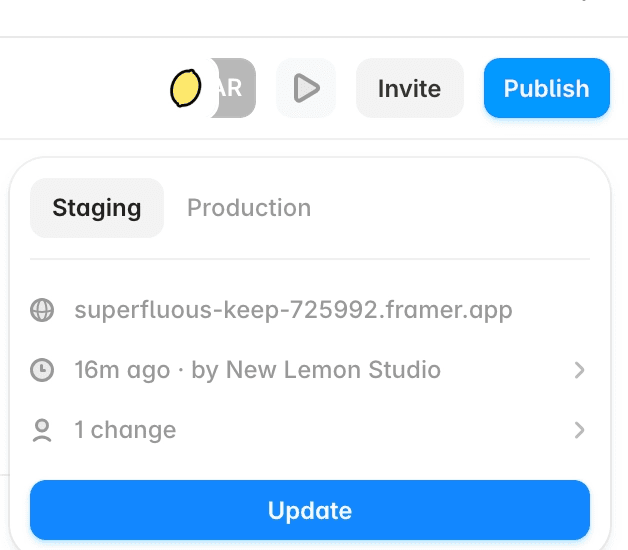
Example: Publish the latest changes to staging so your team can test them. Visitors will continue to see the current production version until you deploy the update.
3. Deploy to the Live Site
Once the staged version has been reviewed and approved, deploy it to production.
In plain terms, this publishes the tested version to your custom domain. Only this step changes the website your visitors see.
There are two ways to deploy:
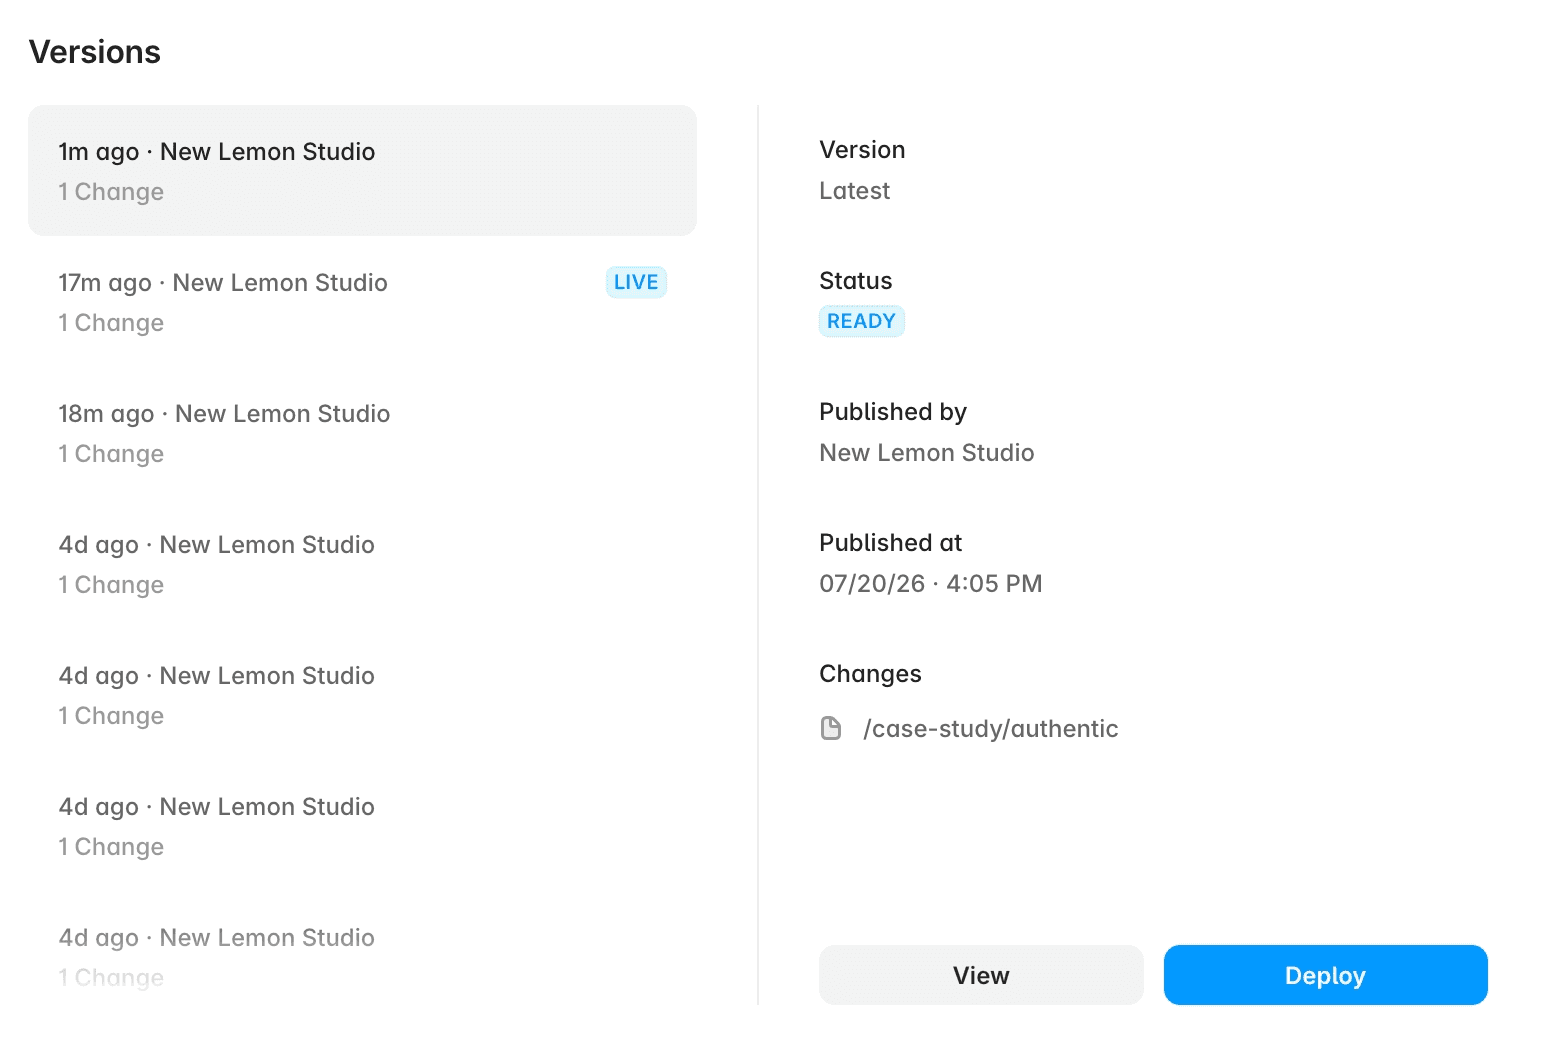
In Site Settings → Staging & Versions, find the approved version and select Deploy.
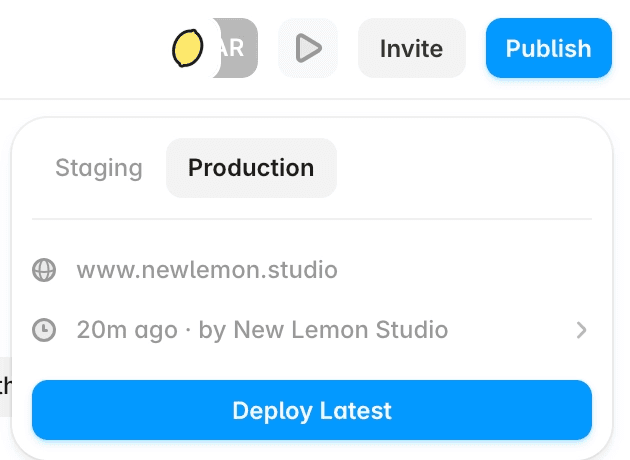
Open the publishing panel in the top-right corner, switch to the Production tab, and select Deploy Latest.
Caption:
Deploy the approved staged version when the team is ready to update the live website.
A Simple Workflow for Marketing Teams
For meaningful website updates, we recommend this process:
Branch → Review → Apply to main → Stage → Test → Deploy
1. Create a Clearly Named Branch
Keep the new work separate from the main project while it is being created.
2. Share the Branch Preview
Let the relevant people review the design, messaging, content, or legal details.
3. Apply the Approved Branch
Move the approved changes into the main project.
4. Publish Main to Staging
Test the website in a browser and on mobile.
5. Approve the Staged Version
Give one person responsibility for confirming that the update is ready.
6. Deploy It to Production
Publish the approved version to the custom domain.
Use the Framer Publishing Workflow Templates
We created two simple Notion templates to help you follow this process after handoff.
Framer Publishing Workflow for TeamsFor teams where website changes need to be reviewed or approved before deployment.
Framer Publishing Workflow for Solo MarketersFor one-person marketing teams managing changes, testing, and publishing themselves.
Both follow the same core process:
Branch → Review → Staging → Test → Production
When You May Not Need a Branch
Not every change needs the full process.
A branch may be unnecessary for:
fixing a small typo
publishing a routine CMS article
replacing one approved image
making a minor copy update
updating a team member’s details
Use a branch when the change is large enough to benefit from separate work and review.
Even for smaller changes, staging can still be useful when the update affects forms, integrations, tracking, mobile layouts, or other important website functions.
Common Mistakes to Avoid
Assuming a Branch Is Visible to Website Visitors
A branch is a separate workspace. Visitors will not see it unless the branch is published as a preview and someone shares the link with them.
Applying a Branch and Assuming the Change Is Live
Applying the branch moves the work into main. You still need to publish it to staging or deploy it to production.
Testing Only in the Framer Editor
Forms, embeds, scripts, redirects, and mobile layouts may behave differently after publishing. Always test important changes in a browser.
Keeping Branches Open for Too Long
The main project may continue changing while an old branch remains unfinished. This can make the final review more difficult.
Keep each branch focused and apply or remove it once the work is complete.
Making the Same Change in Several Branches
If two branches edit the same page or content, the team may need to choose which version to keep.
Agree on who is changing what before several people begin working in parallel.
Giving Everyone Permission to Update the Live Site
Team members may need to prepare and test changes without having permission to publish them publicly.
Framer’s permissions can separate people who publish to staging from those who can deploy to production.
Can You Restore an Earlier Version?
Framer saves a version each time the website is published.
You can view previous versions under:
Site Settings → Staging & Versions
If a problem appears after launch, you can select an earlier working version and deploy it again.
Staging reduces the chance of needing to restore an older version, but it is still useful to know where previous versions are stored.
Frequently Asked Questions
What Is a Branch in Framer?
A branch is a separate copy of the project where you can make changes without affecting main or the live website.
What Is Main in Framer?
Main is the central version of the Framer project.
Approved branch changes are applied to main before they are staged or deployed.
What Is Staging in Framer?
Staging is a published test version of the website. It lets your team review changes in a browser before updating the live domain.
What Is Production in Framer?
Production is the public version of the website that visitors see on your custom domain.
What Is the Difference Between Branching and Staging?
Branching is used while the work is being created and reviewed.
Staging is used after the work has been approved and is ready for final testing.
Does Publishing a Branch Update the Live Website?
No. Publishing a branch creates a preview link for that branch.
The live website remains unchanged.
Does Applying a Branch Publish the Changes?
No. Applying a branch moves its changes into the main project.
You still need to publish the changes to staging and then deploy them to production.
Do We Need a Branch for Every Update?
No. Routine CMS publishing, typo corrections, and minor approved changes may not need a separate branch.
Use branches for larger or higher-risk updates that need review.
Who Should Be Able to Deploy to Production?
Usually, only one or two trusted website owners should have permission to deploy production changes.
Other contributors can prepare and test work without needing access to the public site.
Can We Go Back to an Earlier Version?
Yes. Framer keeps a record of published versions under Staging & Versions, allowing you to restore and deploy an earlier version when needed.
Need Help Setting Up a Framer Publishing Workflow?
As more people contribute to a website, a clear review and publishing process becomes increasingly useful.
At New Lemon Studio, we help B2B marketing teams organise Framer projects around practical ownership, permissions, staging, QA, and post-launch updates.
Planning a handoff or improving an existing Framer workflow? Tell us how your team currently manages website changes, and we’ll help you set up a process that is easy to follow.
Get practical Framer website guides for B2B teams
Monthly notes on website planning, CMS structure, Framer operations, and scalable marketing sites.