Integration
How to Integrate PostHog with Framer
A practical guide to adding PostHog to a Framer website for analytics, conversion tracking, and session replay.
By
Haipeng Yu
·
6
min read
·
Last updated:
Key takeaways
PostHog can be added to Framer through Custom Code. Copy the JavaScript snippet from PostHog and add it site-wide in the
<head>.
Autocapture gives you useful data immediately. PostHog can automatically collect pageviews, clicks, form interactions, and other website activity.
Session replay helps explain what happened behind the numbers. You can review individual visitor sessions and investigate drop-offs or usability issues.
Use explicit events for important conversions. Events such as demo requests or contact submissions are easier to use consistently in funnels and reporting.
Review privacy settings before launch. Consent, session replay masking, personal data, and hosting region should be considered as part of the implementation.
Test tracking on the published site. Confirm events, forms, and custom tracking after Framer has been published.
A practical guide to adding PostHog to a Framer website for analytics, conversion tracking, and session replay.
As one of the most popular analytics tools, PostHog is useful when you want more detail than basic website traffic: which CTAs people click, how visitors move through the site, where they drop out of a funnel, and what happened during an individual session.
For a Framer site, the basic setup is straightforward. Add PostHog’s JavaScript snippet through Framer’s Custom Code settings, publish the site, and PostHog can begin collecting page views and interactions.
This guide covers the basic installation, session replay, and a few implementation details worth considering for a B2B marketing website.
If you are comparing analytics tools more broadly, see our guides to integrating GA4 with Framer and integrating Hotjar with Framer.
What can PostHog tell you about your marketing website?
PostHog combines web and product analytics, funnels, session replay, surveys, experiments, and feature flags in one platform.
Once installed, PostHog automatically captures page views and common interactions such as clicks and form activity. You can start exploring visitor behaviour without manually setting up tracking for every button.
How to set up PostHog on Framer
1. Create a PostHog project and copy the code snippet
Go to posthog.com. Create a PostHog project and copy the JavaScript snippet from the setup flow or project settings (under the General tab).
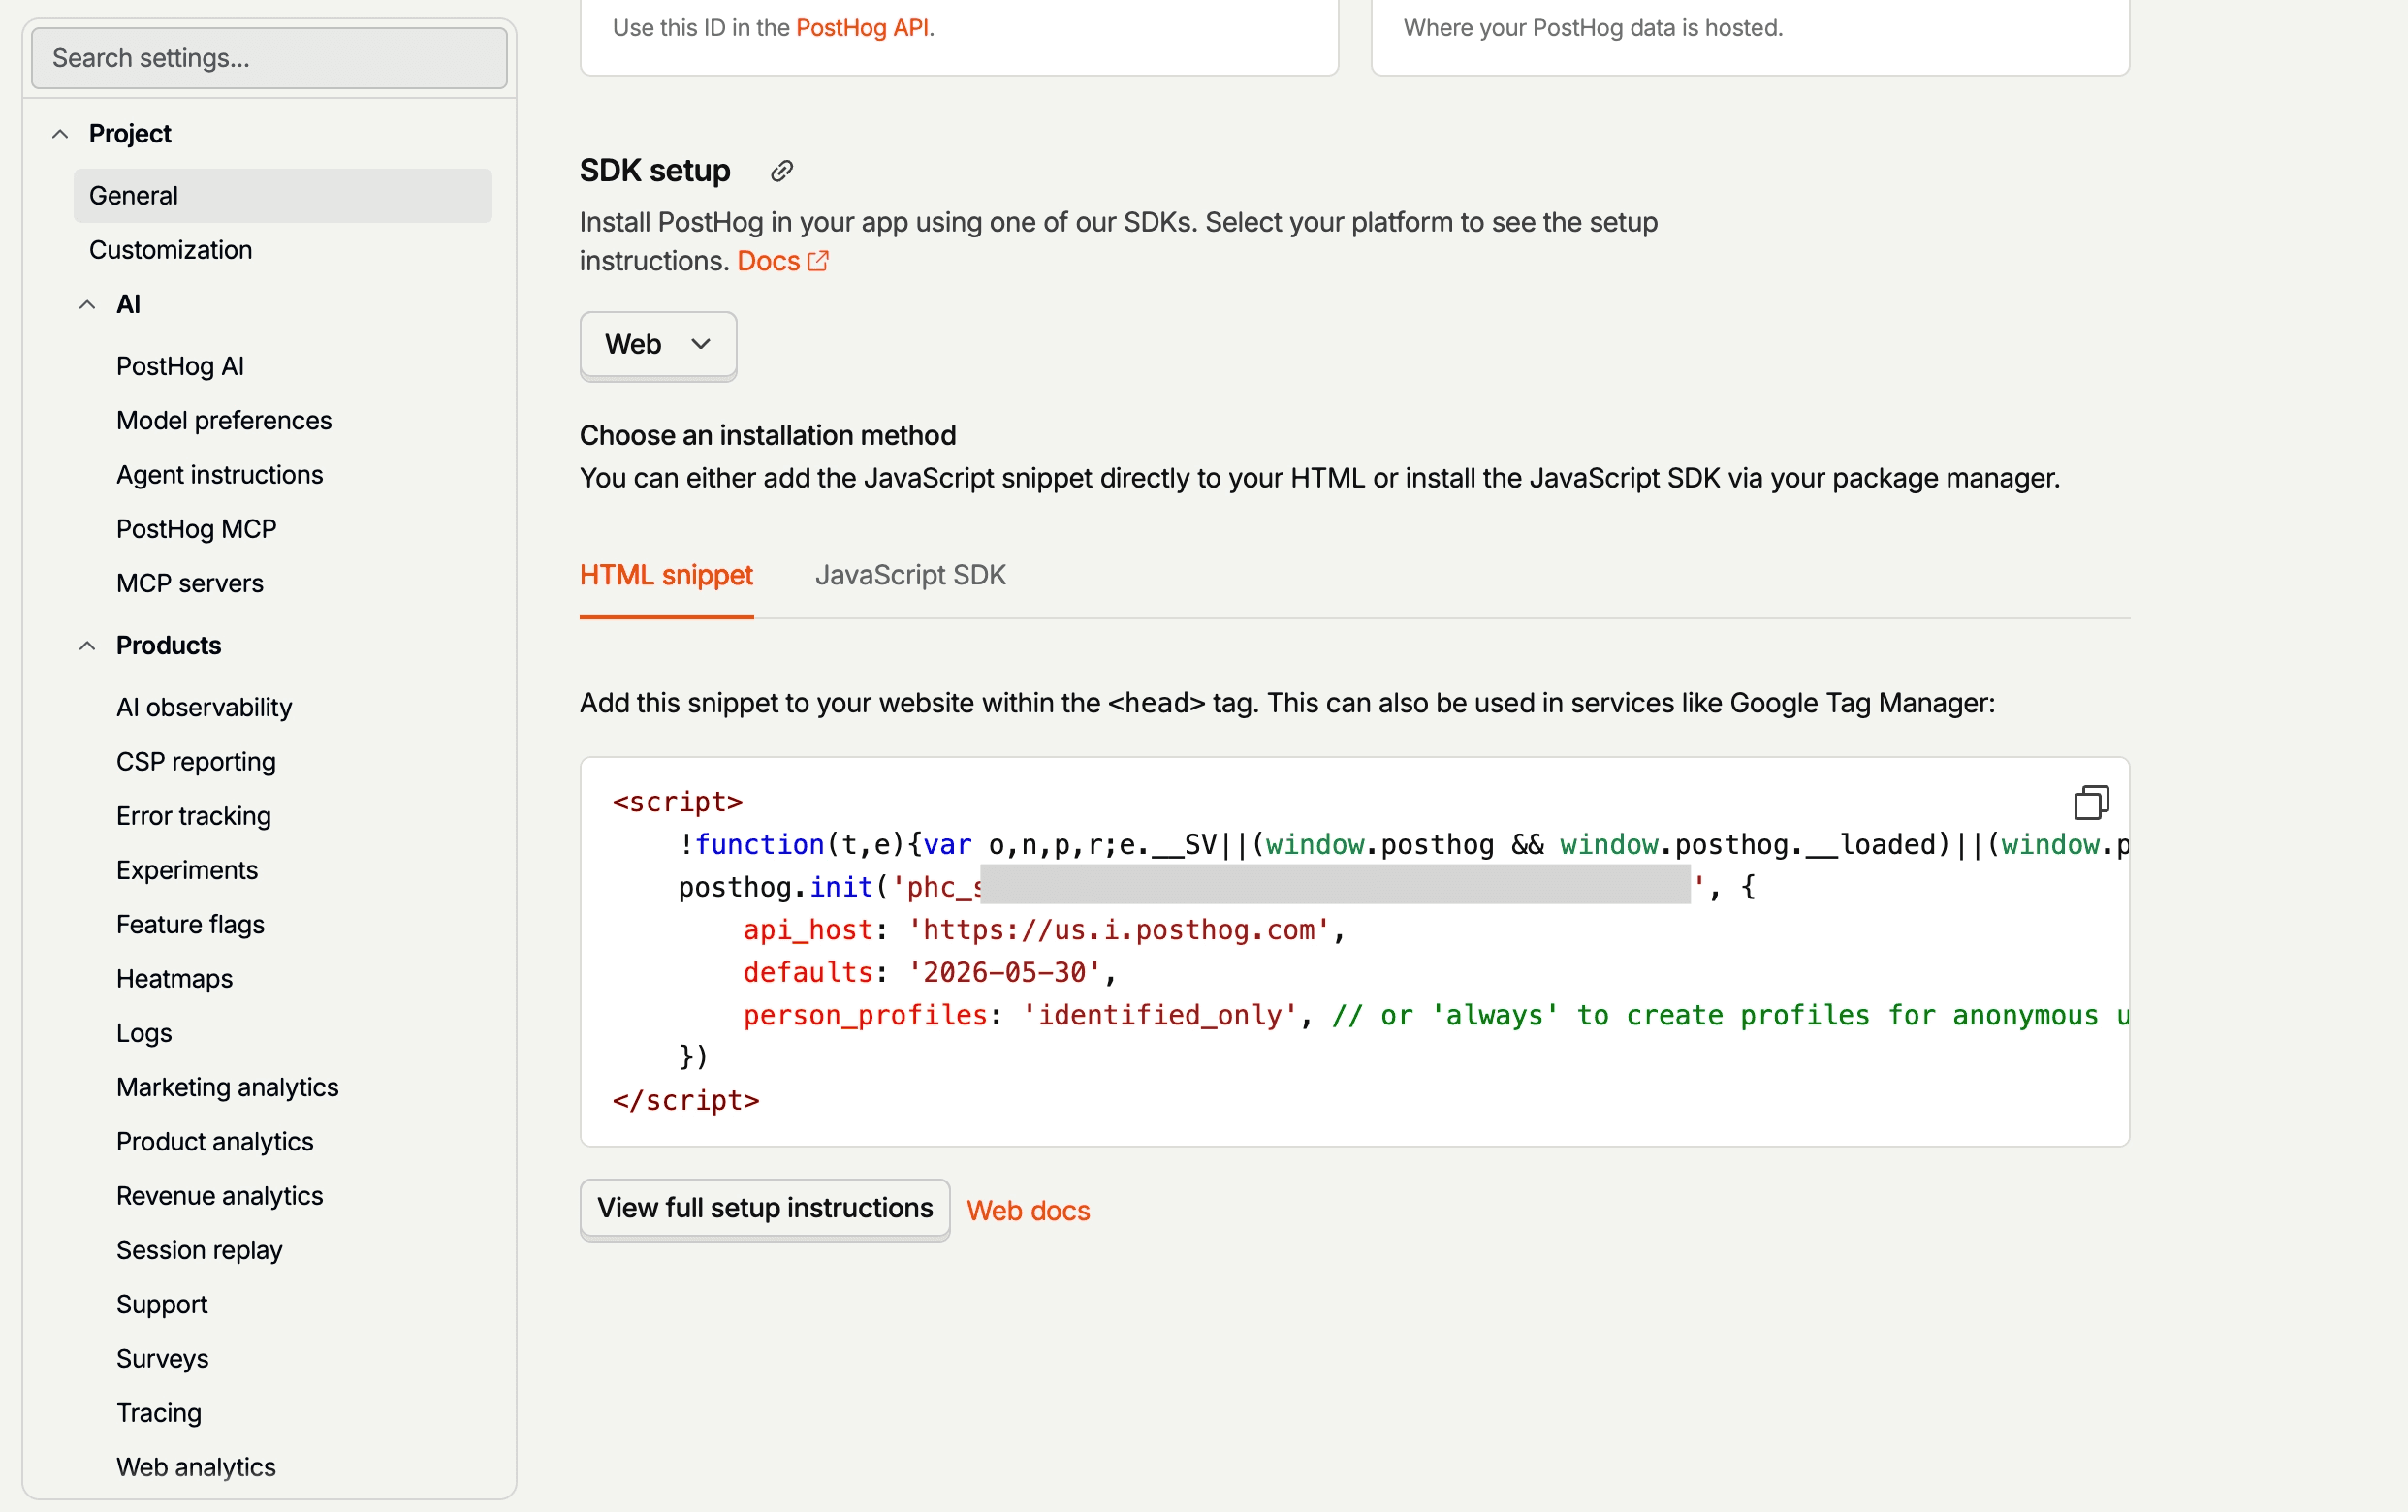
The snippet contains your PostHog project token and the correct ingestion host for your project. PostHog confirms that the phc_ project token is designed to be public.
2. Add the snippet to Framer
In Framer, open:
Project Settings → Code → Add Script
Give the script a clear name such as PostHog.
Paste the JavaScript snippet from PostHog and apply it across all pages. Select end of <head> for the placement, as recommended by PostHog’s Framer guide. Click Add to save the script.
Publish the website, then visit the live site yourself.

3. Check that events are arriving
Return to PostHog and check the live event stream in the Activity tab.
Visit a few pages and click important links or buttons. You should begin seeing page views and automatically captured interactions.

How to enable and watch session replay
PostHog can also record sessions so you can review how visitors actually use the website.
If session recording was not already enabled during the project setup, open the session replay settings in PostHog and enable recording. Once configured, recordings can capture navigation, clicks, scrolling, page changes, and other interactions.
You can then open Session Replay in PostHog and watch individual visits or filter recordings around particular events.

For example, if your funnel shows visitors reaching a demo page but failing to convert, session replay can help you inspect what happened around that step. Here’s a more comprehensive guide on session replay from PostHog.
What should you consider for privacy compliance?
PostHog can collect detailed behavioural data, especially when autocapture and session replay are enabled. Before launching it on a Framer site, review what data you collect and whether user consent is required in the regions where you operate.
PostHog provides privacy controls for masking sensitive data, limiting what is recorded, and handling consent. Its documentation also makes clear that your team is responsible for deciding what data to collect and ensuring that collection complies with applicable privacy laws.
For a B2B marketing site, we recommend:
connect PostHog to your cookie consent setup where required
avoid sending sensitive or unnecessary personal data
review whether IP or person-level data needs to be collected
choose the appropriate PostHog hosting region for your requirements
document PostHog in your privacy and cookie policies
For session replay in particular, review the masking settings before enabling it. PostHog allows text, inputs, and whole elements to be masked before replay data leaves the browser (more details here).
See PostHog’s privacy compliance documentation for the available privacy controls and GDPR guidance.
This is general implementation guidance, not legal advice.
What events are automatically captured by PostHog?
Once the PostHog JavaScript SDK is installed, autocapture is enabled by default for web projects. PostHog can start collecting useful interaction data without you manually adding tracking code for every element.
For a Framer website, this can include:
Clicks and interactions on elements such as links, buttons, forms, inputs, selects, textareas, and labels
Form submissions and form changes
Pageviews and pageleaves
Copy and paste actions
Session replay, if enabled
Heatmap data
Dead clicks, where a click does not trigger a visible page change
Web Vitals, if enabled, including metrics such as LCP and CLS
PostHog records these interactions with context about the element and page, which means you can often start exploring user behaviour before defining any custom events.
See PostHog’s autocapture documentation for the full list of supported events and configuration options.
Tips when integrating PostHog with Framer
Start simple. Install PostHog, confirm pageviews and autocapture are working, then add custom tracking only where it improves your reporting.
Use explicit events for important conversions. Autocapture is useful for exploration, but a clearly named event such as demo_request_clicked is easier for a marketing team to use consistently.
Add useful context to events. Properties such as page, section, CTA type, campaign, or content category can make one event useful across the whole site.
Test after publishing. Analytics scripts and custom events should be checked on the published website, not only inside the Framer editor.
Need help setting up PostHog for your Framer website?
Installing PostHog on Framer is straightforward, and its default tracking provides a useful starting point for website analytics.
For more detailed insights, however, your team will need to decide what should be tracked, how events should be structured, and how the data connects to your marketing funnel.
PostHog can collect a large amount of data, but the value comes from knowing what questions you want to answer. For a B2B marketing team, these might include:
Which homepage CTAs lead to demo requests?
How many visitors move from product pages to the contact form?
Which campaign pages generate conversions?
Where do visitors abandon important conversion paths?
What happened when a visitor encountered a problem?
At New Lemon Studio, we help B2B teams implement Framer analytics, custom event tracking, and integrations.
If you need help setting up PostHog or custom tracking on an existing Framer website, tell us about your setup and we can help you plan and implement the tracking you need.
FAQs
1. How do I integrate PostHog with Framer?
Create a PostHog project, copy the JavaScript snippet, then add it to your Framer site under Project Settings → Code → Add Script. Apply it across all pages, place it at the end of <head>, publish the site, and confirm events are arriving in PostHog.
2. Does PostHog work with Framer?
Yes. PostHog works with Framer through its JavaScript SDK. Once installed, it can track pageviews, clicks, form interactions, session replays, and custom events on your published site.
3. What events does PostHog automatically capture?
PostHog can automatically capture pageviews, pageleaves, clicks, form interactions, copy and paste actions, and other browser events. It can also collect heatmap data, dead clicks, Web Vitals, and session replay data when those features are enabled.
4. Can PostHog record sessions on a Framer website?
Yes. Enable Session Replay in PostHog and it can record how visitors navigate and interact with your Framer site. Review the privacy and masking settings before enabling it.
5. How do I track Framer conversions in PostHog?
You can use PostHog’s autocaptured events or create explicit custom events for important conversions, such as demo_request_clicked or contact_form_submitted. Adding properties such as page, section, CTA, or campaign can make those events more useful for funnels and reporting.
6. Do I need custom events with PostHog?
Not always. Autocapture provides a useful starting point without additional tracking code. For important business actions such as demo requests, form submissions, signups, or downloads, custom events usually make reporting clearer and easier to maintain.
More insights


